
My Laptop Screen is Too Dim
In brighter environments you may notice that your laptop screen is just too dim. This can especially be true when you are running off of battery power as the screen is typically dimmed by default to conserve power.
Adjusting brightness using your laptop's keys
On most laptops, you can adjust the brightness of the display using special keys on the keyboard. The keys are usually marked with a SUN brightness symbol
![]()
Often, the brightness keys are function keys which have a special function if you press them while holding down the Fn key.
The Fn key is usually located to the left of your spacebar. The brightness function keys may be located at the top of your keyboard such as on the F1/F2 or F11/F12, or possibly on your arrow keys.


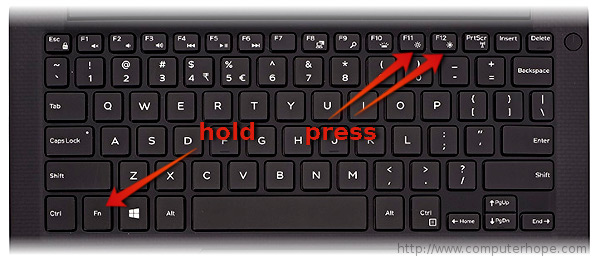
For example, on the keyboard of a Dell XPS laptop (pictured below), hold the Fn key and press F11 or F12 to adjust the brightness of the screen.
Change the Default Brightness Settings
To actually change the default brightness levels, follow these steps. Remember, making your screen brighter by default while on battery will reduce the run-time of your laptop while on battery.
- On your local desktop, click the Windows button at the bottom left hand corner on the task bar or press the windows key on your keyboard
- When the menu pops up, type "Power Plan" in the Search bar. Double click on the result Edit power plan

- When the power plan window opens, you can Adjust plan brightness by moving the sliders. One adjusts the brightness when you are on battery and the other adjusts the brightness when you are plugged in.

- Once you are satisfied with your changes, click one Save Changes

